Secure env secrets with XSOPS, SOPS, GPG, Yubikey and Azure Key Vault
AI coding agents have improved a lot lately and I use them more and more in autonomous mode to help with coding tasks.
While this is a great productivity booster, it also raises security concerns, especially when it comes to managing application secrets like API keys, database credentials, and other sensitive information, as the agents might inadvertently expose these secrets in logs or code snippets or in calls home to their servers.
Also recently there have been various supply chain attacks, so I started looking for a more secure way to manage the secrets in my projects.
Note: The content of this blog post was written by me so no AI generated slop. I used Claude Code just to format the post. Enjoy reading!
Table of Contents
- TLDR
- The Goal
- The Research
- The Solution
- Phase 1: Hardware & Key Setup (~30 min)
- Phase 2: Project Configuration (~15 min)
- Phase 3: Daily Usage
- Verification
- Troubleshooting
- Quick Reference Card
TLDR
flowchart LR
    subgraph Command Process
        F[Command with injected env vars
containing decrypted secrets]
    end
    subgraph Developer / CI/CD / Application
        A[xsops run dev -- command]
    end
    subgraph Decryption
        B[SOPS]
    end
    subgraph Keys
        C[GPG on YubiKey
PIN and touch YubiKey needed
touch cached for 15s]
        D[Azure Key Vault]
    end
    subgraph Encrypted Secrets Files
        E[secrets/dev/env.yaml
in Git - encrypted]
    end

    A -->|1. calls| B
    B -->|3.a. decrypts with| C
    B -->|3.b. decrypts with| D
    B -->|2. read encrypted secrets| E
    B -->|4. injects env vars| F
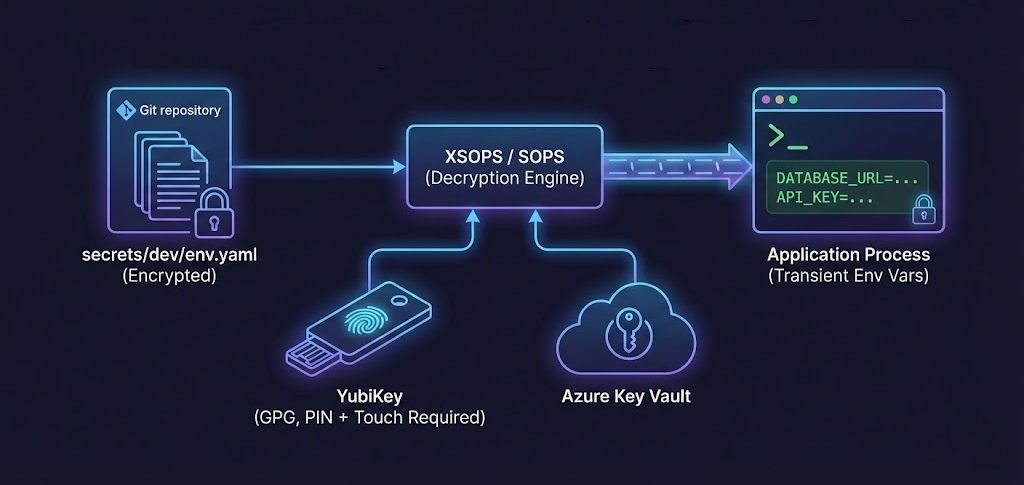
The toolchain: XSOPS → SOPS → GPG (on YubiKey) / Azure Key Vault
- Store encrypted secrets in git using SOPS
- Decryption keys live on hardware (YubiKey) or cloud vaults (Azure Key Vault)
- Use XSOPS to inject secrets into your app at runtime, never written to disk or global env
- Works with any language/framework and CI/CD pipelines
The Goal
Application secrets are to be stored encrypted in our git repository. The decryption keys should be stored securely on hardware security modules like Yubikey or Vaults like Azure Key Vault, only accessible to authorized developers and CI/CD systems. It should be possible to add/remove keys as developers join or leave the team.
No plaintext secrets should ever be stored on disk or in the global environment.
Only when the application is started, the secrets should be decrypted in memory and injected into the application environment.
The solution should be fairly easy to use and should support all kinds of frameworks and languages and also be usable in CI/CD pipelines.
The Research
I spent quite some time researching different tools and approaches. Here is what I ended up using:
The Key Tool: XSOPS
XSOPS is a tool I created to solve this problem. It’s an opinionated wrapper script around SOPS that:
- Enforces per-environment secrets with a standard project structure
- Injects secrets at runtime only—they never touch disk or leak to your global shell
- Works with any command—just prefix with
xsops run <env> --- It relies on the
sops exec-envcommand to decrypt secrets on-the-fly and pass them to the command being run. See the SOPS exec-env documentation for more details.
- It relies on the
- View decrypted secrets without creating temporary files
- Edit encrypted secrets in your default editor
- Work from any subdirectory of your project: the script finds the project root and secret files automatically
Secrets never leak into your global shell’s environment or history; they’re only available to the command you run.
What makes it different from just using SOPS directly? It simplifies usage, works from any subdirectory of your project, and avoids creating temporary files or leaving secrets in shell environment or history.
Supporting Tools
- SOPS: The encryption engine. Supports YAML, JSON, ENV, INI and BINARY formats. Encrypts with AWS KMS, GCP KMS, Azure Key Vault, age, and GPG.
- GPG: GNU Privacy Guard for encryption and signing.
- YubiKey: Hardware security device that supports storing GPG keys. Private keys never leave the device.
- Azure Key Vault: A cloud service for securely storing and accessing secrets.
- Other vaults like HashiCorp Vault can also be used with SOPS.
The Solution
It is going to be a longer guide, so bear with me. Security is always a trade-off between convenience and safety. But I try to keep it as simple as possible.
Note: This guide covers the complete setup from YubiKey configuration to CI/CD integration. Each major section can also be referenced independently.
YubiKey setup for GPG (~10 min)
YubiKey supports multiple interfaces, including PIV (Personal Identity Verification) for smart card functionality and OpenPGP for GPG keys. These are called applets, and each has its own PINs and configuration, which can be a bit confusing.
Prerequisites
Install these before proceeding:
| Tool | macOS | Ubuntu/Debian | Purpose |
|---|---|---|---|
| GPG | brew install gnupg |
apt install gnupg2 |
Encryption |
| YubiKey Manager | brew install ykman |
apt install yubikey-manager |
YubiKey config |
| scdaemon | Included with YubiKey Manager | apt install scdaemon |
Manage Smart cards daemon |
| pcscd | Included with YubiKey Manager | apt install pcscd |
PC/SC Smart Card Daemon |
Verify installation:
gpg --version
ykman --version
Step 1: Initialize YubiKey
- Insert your YubiKey
- Open YubiKey Manager GUI
- Go to Interfaces tab → enable OpenPGP and PIV. PIV enables you to perform RSA or ECC sign/decrypt operations using a private key stored on the smartcard
- Disable other unused applets for security
- Go to PIV tab → reset the PIV applet (this does not affect OpenPGP keys)
- Set new PIV PINs. Store them securely, ideally offline or in a Password manager.
Step 2: Change OpenPGP Default PINs
The OpenPGP applet has separate PINs from PIV. Change them immediately:
gpg --card-edit
Then in the GPG prompt:
gpg/card> admin
gpg/card> passwd
| PIN Type | Default | Purpose |
|---|---|---|
| User PIN | 123456 |
Required for daily operations (sign/decrypt) |
| Admin PIN | 12345678 |
Required for key management |
| Reset Code | (none) | Used to reset User PIN if locked |
Store PINs securely! Save these in a password manager or offline storage. If you lose the Admin PIN and lock your User PIN, you’ll need to reset the OpenPGP applet (which deletes all keys on the card).
The User PIN will be required each time you use the GPG key stored on the YubiKey to unlock it, then it will be cached for a configurable amount of time, usually 15 seconds. There is also a touch requirement that can be configured to require a physical touch on the YubiKey to use the key, which we will enable later for better security.
Step 3: Verify Setup
gpg --card-status
You should see your YubiKey details including serial number and available key slots.
GPG Key Generation Approaches
There are two approaches for GPG keys on YubiKey:
| Approach | Pros | Cons |
|---|---|---|
| Generate on YubiKey | Private key never leaves device | No backup possible. Lose key, lose access |
| Generate on computer, transfer to YubiKey | Can backup before transfer | Key briefly exists on computer |
This guide uses keys generated on the computer for backup capability. The private key briefly exists on your computer during generation. Perform this on a trusted, secure machine and delete backups from the computer after storing them safely.
For extensive details, see:
- My fork of the YubiKey Guide (based on drduh’s comprehensive guide)
- Yubico’s official GPG documentation
Generating GPG keys and transferring them to YubiKey (~15 min)
We will setup the GPG keys on a computer, backup the keys securely (ideally offline or in a Password manager), and then transfer them to the YubiKey.
Generate a new GPG key pair:
gpg --full-generate-key
Follow the prompts to select key type, key size, expiration date, and user ID information.
I used the following settings:
- kind of key
- (9) ECC (sign and encrypt) default
- elliptic curve name
- (1) Curve 25519 default
- valid for (I choose 0 for no expiration, but you can choose expiration if desired, then you have to renew the keys later):
- 0 = key does not expire
- Real name: Your Name
- Email address: your.email@example.com
- Comment: optional comment
- Passphrase: choose a strong passphrase to protect your private key. This passphrase will be required whenever you use the key.
The result will look something like this:
public and secret key created and signed.

pub   ed25519 2026-01-05 [SC]
      19D322F4E80F5522E966C0B38933AF493E0CA254
uid                      Your Name <your.email@example.com>
sub   cv25519 2026-01-05 [E]
Backup the generated keys:
gpg --export --armor <key-id> > publickey.asc
gpg --export-secret-keys --armor <key-id> > privatekey.asc
Critical: Store privatekey.asc in a secure offline location or password manager, then delete it from your computer. Anyone with this file can decrypt your secrets. This is your only backup. If you lose both the YubiKey and this file, you lose access to your encrypted data permanently.
Transfer the keys to the YubiKey:
gpg --edit-key <key-id>
In the GPG command prompt, use the following commands:
key 0: Select the primary key (signing and certifying).keytocard: Transfer the selected key to the YubiKey. Follow the prompts:- Really move the primary key? (y/N) : y
- Select the slot where to store the key: usually 1 for Signature key
- Enter the passphrase for the key.
- Enter the admin PIN of the YubiKey.
Then repeat for the subkey:
key 1: Select the second subkey (encryption key). It will be marked with an*next to it (e.g.ssb*to show it is selected).keytocard: Transfer the selected key to the YubiKey. Follow the prompts:- Select the slot where to store the key: usually 2 for Encryption key
- Enter the passphrase for the key.
- Enter the admin PIN of the YubiKey.
save: Save the changes and exit the GPG command prompt.
Verify the keys were transferred on the YubiKey:
gpg --card-status
You should see the keys listed under Signature key and Encryption key sections.
Verify the keys are no longer on the computer:
gpg --list-secret-keys
The output should now show a > for the keys stored on the YubiKey, indicating they are no longer on the computer. Also the card serial number should be shown.
sec>  ed25519 2026-01-05 [SC]
      19D322F4E80F5522E966C0B38933AF493E0CA254
      Card serial no. = 0006 12345678
uid        [ultimate] Your Name <your.email@example.com>
ssb>  cv25519 2026-01-05 [E]
Any signing/encryption/decryption operation from now on will require the YubiKey to be connected and the user PIN to unlock it + any touch requirement configured.
Enable touch requirement with caching on YubiKey for OpenPGP keys (~2 min)
Recommended security step! This adds physical presence verification. Even if malware captures your PIN, it cannot use your keys without you physically touching the YubiKey.
This adds another multi-factor authentication: even if malware captures your PIN, it can’t use your keys without physical access to the YubiKey. When enabled, the YubiKey blinks and waits for a physical touch before any cryptographic operation. It will also cache the touch requirement for 15 seconds after use for better usability, otherwise you would have to touch the YubiKey for each operation which can be annoying if you have multiple secrets to decrypt.
ykman openpgp keys set-touch dec cached
ykman openpgp keys set-touch enc cached
ykman openpgp keys set-touch sig cached
ykman openpgp keys set-touch aut cached
Why cached?
| Policy | Behavior | Use Case |
|---|---|---|
Off |
No touch required | Convenience, lower security |
On |
Touch required every time | High security, but impractical for batch operations |
Fixed |
Like On, but can’t be disabled without deleting the private key |
Maximum security, can’t be changed |
Cached |
Touch once, valid for 15s | Best balance—secure yet practical for decrypting multiple secrets |
Cached-Fixed |
Like Cached, but can’t be disabled without deleting the private key |
High security with usability |
I recommend Cached because when decrypting environment secrets, SOPS may need multiple decrypt operations. With On, you’d need to touch the YubiKey for each secret. With Cached, one touch covers operations within 15 seconds—enough for typical startup scenarios while still requiring physical presence.
Generate GPG keys for all team members and provide them with YubiKeys
Create a GPG key pair for each developer that needs access to the secrets. Store the private keys securely on Yubikeys or other hardware security modules.
Configure Azure Key Vault Encryption Key
Set up an Azure Key Vault and create a key for encryption. Grant access to the Key Vault to authorized developers and CI/CD systems using Managed Identity or Service Principals, ideally over Azure RBAC.
Install SOPS and XSOPS (~5 min)
SOPS Installation
| Platform | Command |
|---|---|
| macOS | brew install sops |
| Ubuntu/Debian | Download from GitHub releases |
| Windows | choco install sops or download from releases |
Verify: sops --version
XSOPS Installation
Quick Install (Linux/macOS)
curl -fsSL https://raw.githubusercontent.com/codingarchitect-wq/xsops/main/install.sh | sudo bash
Or install to a custom path (no sudo required):
curl -fsSL https://raw.githubusercontent.com/codingarchitect-wq/xsops/main/install.sh | bash -s -- ~/.local/bin
To verify installation, run:
xsops
Project Structure (~5 min per project)
xsops script expects your projects to have this structure:
your-project/
├── .sops.yaml              # SOPS configuration
└── secrets/
    ├── dev/
    │   └── env.yaml        # Encrypted secrets for dev
    └── prod/
        └── env.yaml        # Encrypted secrets for prod
dev and prod are environment names you can define as you like.
Create a SOPS configuration file in each project
Create a .sops.yaml file in the root of your project to define the encryption rules for your secret files.
Example .sops.yaml using both PGP (plain or stored on YubiKey) and Azure Key Vault keys:
# .sops.yaml
stores:
  yaml:
    indent: 2

creation_rules:
  # Dev secrets
  - path_regex: secrets/dev01/.*\.yaml$
    pgp:
      - PGP_KEY_ID_HERE
    azure_keyvault:
      - https://devkeyvaultname.vault.azure.net/keys/keyname/version

  # Prod secrets
  - path_regex: secrets/prod/.*\.yaml$
    pgp:
      - PGP_KEY_ID_HERE
    azure_keyvault:
      - https://prodkeyvaultname.vault.azure.net/keys/keyname/version
Create and encrypt secret files
Create your secret files in the appropriate environment folders and encrypt them using SOPS.
Example secrets/dev/env.yaml (before encryption):
DATABASE_URL: postgres://dbuser:testpwd@localhost:5432/myapp_dev
API_KEY: sk_test_apikey
Encrypt with: xsops encrypt dev
The encrypted file will look something like this:
DATABASE_URL: ENC[AES256_GCM,data:...,iv:...,tag:...,type:str]
API_KEY: ENC[AES256_GCM,data:...,iv:...,tag:...,type:str]
sops:
  azure_kv:
    - vault_url: https://devkeyvaultname.vault.azure.net
      name: keyname
      version: version
      created_at: "2025-12-08T14:06:26Z"
      enc: SRUWx...........gaOA
  lastmodified: "2025-12-10T21:42:25Z"
  mac: ENC[AES256_GCM,data:....,iv:...,tag:...,type:str]
  pgp:
    - created_at: "2025-12-08T14:06:26Z"
      enc: |-
        -----BEGIN PGP MESSAGE-----

        h...5g==
        =27qa
        -----END PGP MESSAGE-----
      fp: D...D
  unencrypted_suffix: _unencrypted
  version: 3.11.0
Using XSOPS to run your application with decrypted secrets
Use xsops to run your application with the decrypted secrets injected as environment variables.
Example command to run your application in the dev environment:
xsops run dev -- your-application-command
This command will:
- Decrypt the secrets from
secrets/dev/env.yamlusing SOPS. - Inject the decrypted secrets as environment variables for
your-application-command.
CI/CD Integration
In your CI/CD pipeline, use xsops to run your build and deployment commands with the appropriate environment secrets.
The identity used by the CI/CD system must have access to the Azure Key Vault or to the GPG keys (if using GPG).
SOPS will automatically use the available keys to decrypt the secrets.
Verification
Before using this setup in production, verify the complete flow works:
1. Test GPG + YubiKey
# Ensure YubiKey is detected
gpg --card-status

# Test encryption/decryption (YubiKey must be inserted)
echo "test" | gpg --encrypt --recipient <your-key-id> | gpg --decrypt
# Should prompt for PIN and touch, then output "test"
2. Test XSOPS encryption/decryption
Troubleshooting
Quick Reference Card
Daily Commands:
# Run app with secrets
xsops run <env> -- <command>

# View decrypted secrets (read-only)
xsops view <env>

# Edit secrets in editor
xsops edit <env>

# Encrypt new/modified secrets
xsops encrypt <env>
First-Time Setup:
# Check YubiKey
gpg --card-status

# Test decryption works
echo "test" | gpg --encrypt --recipient <key-id> | gpg --decrypt
Quick Fixes:
# YubiKey not working
gpg-connect-agent "scd serialno" "learn --force" /bye

# GPG agent issues
gpgconf --kill gpg-agent && gpg-connect-agent /bye